Senin, 30 Juli 2012

Malted Yakult Cupcakes


This post is brought to you by the number "two". Why two? Read on -


  • Two - number of k's on my name. Yep, it's Aikko, not Aiko or Aico or Iko :)
  • Two - that sunny day in April when I was born. For 29 years I believed I am an Aries but apparently I am really a Pisces... one thing's for sure... I am confused.
  • Two - number of pairs of boxing gloves under my name that I haven't used in a while. I thought having a pair in hot pink will keep me motivated to keep on boxing. I was wrong. 
  • Two - flavors most blogged about in Chocolate Happy. Uh... I mean Vanilla Happy. Wait, it's Bake Happy.


  •  Two - number of times I had to experiment on these Yakult cupcakes to get it right.

Yep, you heard it right! Yakult Cupcakes. 
I first blogged about it here. As part of my Pinoy Cupcakes series, only it's just half Pinoy because, well, Yakult is really a Japanese product. And it tastes sooo dang good! So good it deserves a re-cake. 

Hope you guys like it!

Malted Yakult Cupcakes
350F
Makes 20 cupcakes

Ingredients:
1 ½ cup sugar
1 cup mayonnaise
1 tablespoon vanilla extract
2 1/2 cups flour
1 tsp baking soda
2 tsp baking powder
1 tablespoon malt (optional - it just gives the cake an extra caramel-y taste)
1 ½ cup milk
Yakult (5 85 ml bottles or more)

Whipping cream for topping 
Cinnamon for garnish

 Here's How

(1) Combine mayonnaise, sugar and vanilla.
 (2)  Mix well until sugar is almost dissolved.
 (3) Combine all dry ingredients and add a third to the mayonnaise mixture.
 (4) Add 1/2 of the milk
 (5) Repeat until all is combined. Place into paper liners and bake until golden brown, about 15 - 20 minutes.
 To Assemble
(6) Remove from cupcake from liner and put into a candy cup. 
Now now now... you are probably asking, why didn't Aikko bake the cupcakes in the candy cups? Saves time, liners and lots of washing the dishes. The thing is, I used to bake in candy cups until I heard about the great party nut cups (another term for the candy cups) debate over at Wilton. Is it safe to bake in candy cups? Some say yes, some say no. Some say it's not advisable because the wax might melt when subject to high temperatures, some say it might cause fire. 

So, just to be on the safe side, I stopped baking in them. But they're just too darn cute not to use! Right?! So what I do is bake them in traditional cupcake pans and just transfer them. Better be safe than sorry. 

How about you? What's your take in baking in Candy Cups? I'd love to hear it :)
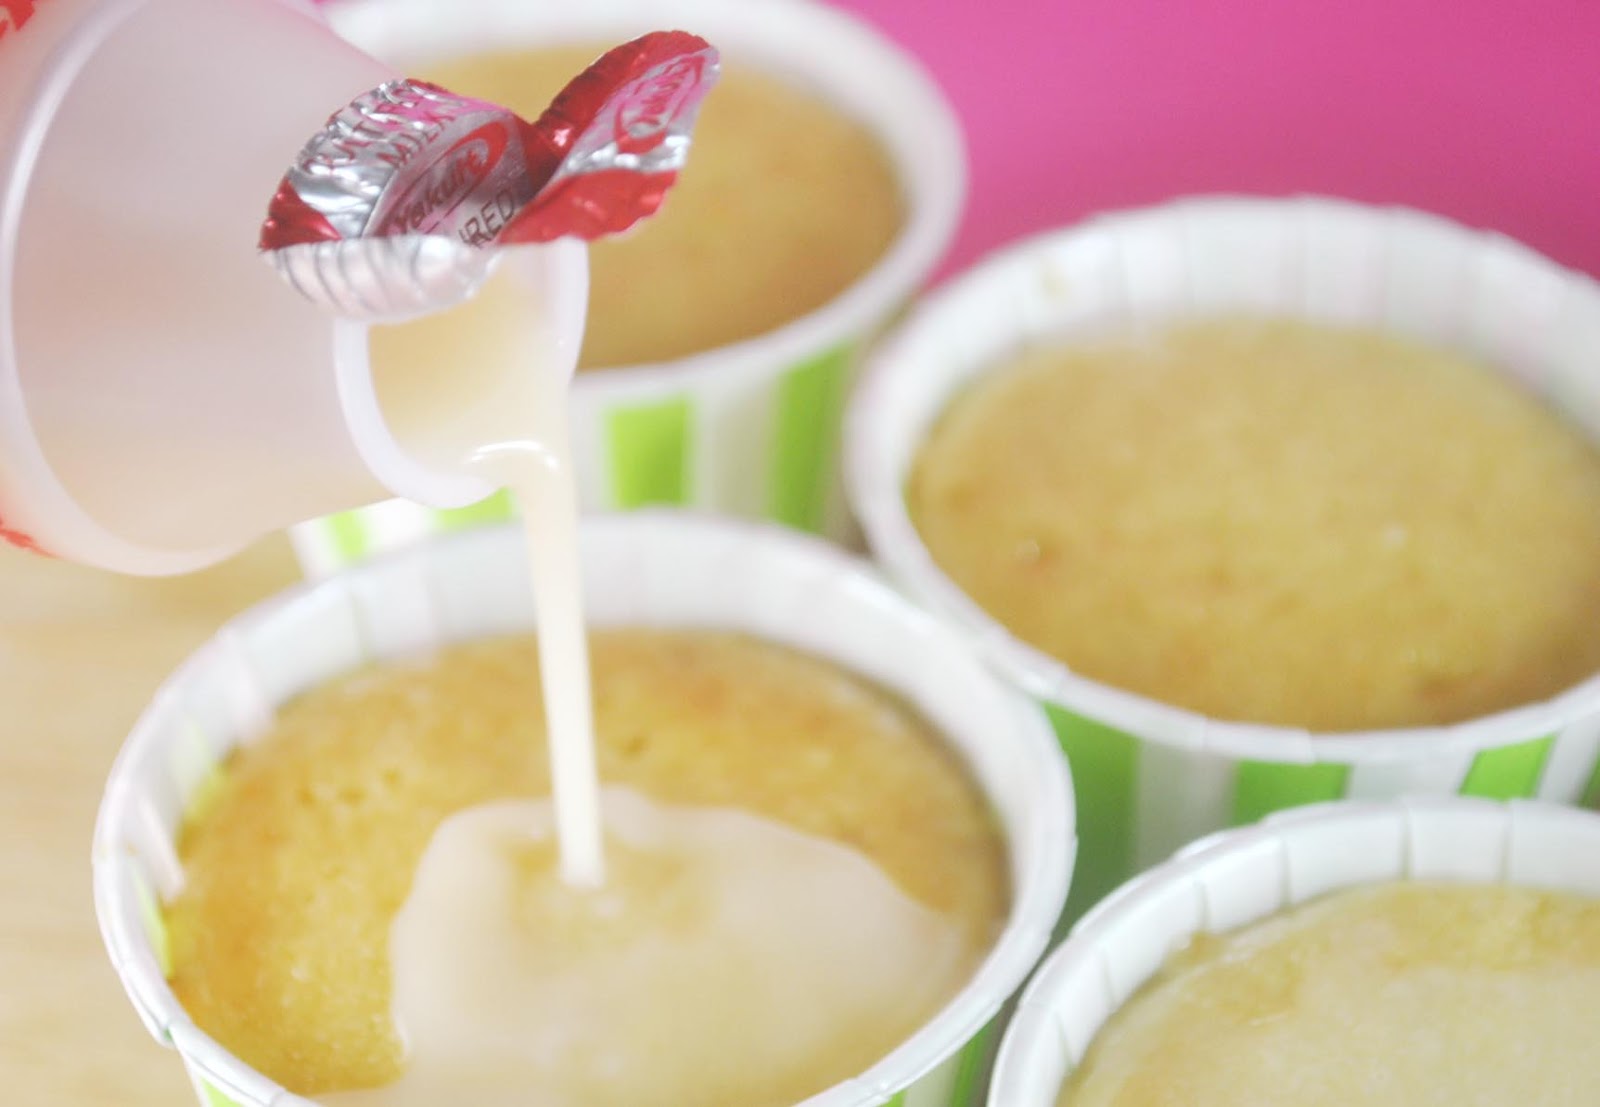
(7) Anyway, back to the cupcakes. Using cocktail sticks, poke holes into the cuppies and pour a generous amount of Yakult over it. Ahhhh....
 (8) Top with whipped cream and sprinkle with Cinnamon.
I have tried this on an 8-inch pan, on mini cupcakes, and on regular cupcakes but I must tell you, they taste better on mini cupcakes. 

If you want a quick fix, ditch baking the cupcakes, go to your nearest bakery, splurge on mamon, taisan or sponge cake, soak it in Yakult and cover in whipped cream. Quick fix yet same delicious result :)

ps: although we're on the subject of number two, I am hoping in your heart, Bake Happy is number one :)

Love you!

Kamis, 26 Juli 2012

Sprinkle Bakes Book Giveaway! (Closed)


If there is an artist-baker-blogger I can totally relate it to, it has got to be Heather of Sprinkle Bakes. Take a looong look at her blog(but please make sure to come back as there is a surprise at the end of this post) and you’ll see what I mean.

See? A-M-A-Z-I-N-G cannot begin to describe the passion she has for her craft. Her work literally leaps out of the pages (or screen or wherever you're viewing) . It just tells so much. Oh wow! (On a different note, I wish I could rock long hair as good as she does. Mine just falls awkwardly flat, that’s why right now, my hair is cut short in a wash and wear kind of way.)


Sometimes, I wish I could pack my bags, and take a vacation onto her very talented mind. Take a peek here and there, visit every nook and cranny, check out every street and every aisle to see where the inspiration comes from.

Luckily, I didn’t have to do that (That sigh I just heard could probably come from Heather, breathing a sigh of relief I didn’t have to spend my vacation time in her mind). Heather recently published a book. Not just any baking book. As the tag line says, it contains Dessert Recipes to Inspire Your Inner Artist. Wanna take a peak?

Here's the Glittering Cookie Tree bursting with colors!


How about these Tuile Cookie Spoons with Peanut Butter Mousse? I think only Heather can think of that.
 Such a classic, these Queen of Hearts Cookies that is.
And this post will not be complete without sharing with you these Mehndi Hand Cookies. What did I tell you? Totally rad she is!

And so for my very first giveaway, I am giving away copies of Heather Baird’s first book Sprinkle Bakes to three very lucky Bake Happy friends! Yup! I'm saying first because I know with the kind of amazing talent she has, there will definitely be a second book, and a third and a fourth... Oh well you know what I mean.

And I know you see four books, but the fourth one is mine okay? I have to save one for me of course! 


Here's your chance to WIN a copy of Sprinkle Bakes of your very own! (Giveaway now closed. Thanks for all who joined!)


Here's how to Enter:
1) 
Like Bake Happy on Facebook
2) 
Post the following status on your Facebook wall:

Bake Happy is giving away three copies of Heather Baird's Sprinkle Bakes Book! Join by going to 
http://bakehappy.blogspot.com/2012/07/sprinkle-bakes-book-giveaway.html. Happy baking! 
          Please make sure that Bake Happy is TAGGED and the post is set as PUBLIC.  


3) Deadline for entry is August 3rd, 2012.
4) Winners will be chosen via electronic raffle and contacted via email or whatever contact details stated in their entries. Winners will be announced on this blog and on Facebook
5) Winners may be asked to pick up their prizes at Makati or will receive their prizes by courier, depending on their address.
6) Contest is open to anyone with a valid shipping address covered by LBC or UPS 
7) If you agree to the above and the official rules here, leave a comment to this post with the following info:


          a. Name:
          b. FB Post Link: 
          c. And most importantly, please make sure to leave an email address or some way to reach you if you win!


Note: To get the FB post link, click the timestamp. Example of timestamp: 5 seconds ago


Right click on the timestamp and choose "Copy Link" to get the FB post link 


or 


click on the timestamp and copy the link that appears on the address bar 


Good luck!

Senin, 23 Juli 2012

Bake Happy’s Marshmallow Fondant Recipe

(Updated)

Ahh fondant… we all have our share of woes and worries on this one.

Sometimes,  all is smooth sailing and we’re the best of friends. It’s like life is one big 1950s MGM grand musical production - nothing can ever come out wrong. Me and good ole friend fondant, we look at life through rose colored glasses. Ready to take on whatever challenging cake design that come our way. We cake buddies stick together. Like glue.

But sometimes, hell hath no fury like a fondant scorned. And just how, you might ask, can a fondant be scorned? Make it when it rains, make it when it's humid, make it when the weathers is changing like there's no tomorrow and you know what I am talking about.

Take these cupcake toppers for example, see how shiny they are? 

I made them one rainy night and almost had a meltdown because they seem to melt in an alarming speed as I race to the finish line. Okay that’s exaggeration. What happened was, it was too soft in an almost melting kind of way. They barely held their shapes especially since the design was a gravity defying one. And they were too shiny for my taste. I prefer my fondant matte.

You see, fondant that is shiny is okay as long as it’s sturdy. But shiny and melting? Now that’s another story.

Anyway, I searched high and low for a recipe that won’t fail me, a recipe that can proudly withstand the Philippine weather. And I found it. Now, not only will the toppers not melt, they can even be real sturdy enough that I no longer panic when transporting cakes.

Ahhh…  transporting cakes, another nervewracking topic which we’ll talk about in another post. But right now, I am sharing with you how I make marshmallow fondant.  

This is the recipe for fondant I always use covering cakes like the one above and making the toppers for the tutorials for this blog. 
 Bake Happy’s Marshmallow Fondant Recipe

Ingredients:
1 kilo powdered sugar
500 grams marshmallow
2 tablespoons water
2 - 4 tablespoons shortening
1 pack Gummix Fondant Improver (optional)
Corstarch
Here’s how:
(1) Grease a bowl with shortening
 (2) Add the marshmallow then add water
 (3) Microwave for 2 and a half minutes at 30 second intervals.
After the first interval, it seems nothing happened but before you panic and think that your microwave is broken, get a spatula and dig deep, you will notice the mallows getting stickier
 (4) After the second interval you can see the mallows sticking together now.
 (5) After the third interval, mix more and you can see it finally melting.
 (6) After the fourth interval, finally. It's now melted.
 (7) Grease your working area with shortening. Sift sugar
 (8) Make a well.
 (9) Dump mallows at the center
 (10) Add the Gummix on top of the fondant.
 (11) Using a scraper, let the mallows and sugar come together
 (12) When it's starting to come together, rub your hands with shortening and start kneading
 (13) Gradually add the shortening. Depending on the weather, I sometimes use just two tablespoon or as generous as all of the 1/2 cup. You can still see some cracks, continue kneading
 Depending on the weather, you can all use up the 1 kilo of sugar or sometimes less.
 (14) In the last stages of kneading, add in cornstarch to smoothen the fondant.
 (15) Lastly, grease the fondant and cover in plastic wrap then put in an airtight container.

This recipe works for me. When this is the fondant I use, I’m confident the cakes I make will make it to the destination in one piece, not one tiny topper out of place. Although, I must warn you, it’s not perfect. Here’s the 411 on Bake Happy’s Marshmallow Fondant Recipe -

What I like about it:
·       It has a chewy texture.
·
       Way too yummier than regular fondant
·
       It just won't melt. Pinky swear.
·
       It’s strurdy.
·
       Yes it’s sturdy but it will never harden like a rock (unlike gumpaste)
·
        I don’t need to add tylose anymore. Well, generally speaking. But if I’m making something that’s gravity defying, I make sure to add some tylose onto my fondant.
·
         Color is as bright as I want it to be. Unlike gumpaste where the color lightens as time goes by. For marshmallow fondant, the color just intensifies just the way I like it.

What I don’t like about it:
·         ·        Harder to knead than regular fondant. The muscles on my right wrist is way too developed that the one on my left (translation: right wrist, fatter than left wrist)
·         ·        It needs to be microwaved when you use it the day after. And like all food put in the microwave, the longer it's there the harder it’ll become to manage. But this one has a loophole, knead in shortening after it’s microwaved and it’ll be pliable again.
·         ·        Depending on the amount of shortening in the fondant, it might not be as pliable as regular fondant.
            ·       Depending on the weather, I just use 2 tablespoons of shortening. But if I need my fondant to be really pliable (especially when making toppers or really small details), I use up to ½ cup shortening.

More on Bake Happy’s Marshmallow Fondant Recipe
  •         I microwave the marshmallows for only two minutes at 30 second intervals, this just means that the mallows are still fluffy. If you want it to be more fluid, add 30 seconds or a minute of microwave time. Just make sure not to burn the mallows.
  •         The earliest you can use the fondant is the day after it’s made. It will allow the marshmallow and sugar textures to “marry”. Otherwise, you’ll have a gritty fondant
  •         Resulting fondant not too white? Use white food coloring to whiten it up
  •         If you ask me if the Gummix I use has a substitute, honestly, I don’t know. From what I know, the Gummix I use is made by Peotraco, a local food manufacturing company. Per the package the Gummix is made out of powdered sugar, modified starch, vanillin and gum.
  •         Can you make it without the Gummix? Yes of course. Though it makes a lot of difference if you do especially in our kind of weather in the Philippines.


Got a question? Just let me know so I can answer them. Just no math questions please, okay? :)


Minggu, 22 Juli 2012

Perfectly Moist Chocolate Cake FAQ


You, my dear Bake Happy friends, are important to me. Very, very, very important. As in I think of you all the time. Oops that sounds totally stalkerish. I'm not getting my point across, am I?

What I mean is you're important to me (I guess I don't have to elaborate on that one, do I?)
I just want you all to know that. 
That's why whatever you ask, I answer. 

Okay then, I try to answer to the best of my ability. And I noticed that a lot of you my dearest friends have questions about this cake - 


My Ma's Ultimate Chocolate Cake Recipe. Best Chocolate Cake Recipe ever. Totally Rad Chocolate Cake Recipe. And as I said, because you are important to me, I compiled the Top Ten most asked questions in one single post. Ready? So am I nice or am I nice? 

Here it goes -

1. Can your Ma's chocolate cake recipe be able to hold the weight of rolled fondant?
You got that right! This is the chocolate cake recipe I used inside this cake 
And on this cake too -
Oh wait, on this one also -
But as you can see, I only recommend it for single tiered cakes. Haven't tried it with  two or three tiered cakes. If you have, let us know okay?

2. Wait, did I read the ingredients correctly, no eggs and butter?
Yup, that is correct. The mayonnaise replaced the need for eggs and butter.

3. What brand of mayo do you use?
Any brand will do, but I use this one
4. Shall I use hot, cold or tap water?
'Cause you're hot then you're cold, You're yes then you're no... Uh... before I start dancing to Katy Perry's hits, here's my answer - tap water will do just fine.

5. What brand of cocoa powder do you use?
Valrhona, Bernsdorp, Hershey's and Ricoa are the ones that I have tried this recipe with. They all work great. But the best tasting version of this chocolate cake was when I used Callebaut. It was just perfect. Too bad they no longer carry this brand in cocoa powder form in the Philippines. 

6. How many cupcakes can one batch of your Ma's recipe make?
When I make cupcakes, I always use the 3oz cups. These 3oz cups can hold 1/4 cup of chocolate batter each. One batch can make 20 cupcakes.

7. I'm making an 8-inch round cake, how many batches of your Ma's recipe will I make?
 If you want to make a round cake 4 inches high, follow the below guide
7-inch cake: 1 batch
8-inch cake: 2 batches
9-inch cake: 3 batches
10-inch cake: 4 batches 

Easy peasy yeah?

8. Can you share us the Bakers Percentage of the quantities of the ingredients?
Oh... Oh my... a math question. whenever I hear a math question it's just like I drank a ginormous tub of Slurpee in under a minute... My mind panics and just freezes blank. But don't worry I tried converting the recipe to what I call my amateurish take on the Bakers Percentage. I tested this and works great - 

220 grams flour
300 grams sugar
50 grams cocoa powder
1 tsp baking soda
2 tsp baking powder
360 ml cup water
240 ml mayonnaise
1 tsp vanilla extract


Though, if anyone of you knows how to properly convert the recipe, do let us know, 'kay?
  
9. How come the cake falls apart when cut horizontally into half? 
That's because we barely mixed the flour into the batter. This means that the gluten (the one responsible for toughening up cakes) has barely been activated. Mix some more to make it more sturdy.

10. Thank you for sharing your Ma's recipe. Can I give your hug?.
Abso -bloomin'- lutely! 
In my mind, I am hugging you all right now :)

There you have it folks! If I still haven't been answered your questions, do let me know, and I'll try to answer the best that I could. Just limit math questions ok?


Rabu, 18 Juli 2012

How to Make Safari Cupcakes - Fondant Elephants


So here's the deal. I need you to sit down. 

Take a deep breath. 

Prepare yourself. 

What I am about to tell you is of utmost importance. 
In this day and age, it is important to once in a while drop whatever your doing and de-stress. Read a book, take a stroll in the park, have dinner with friends. Or de-stress by staring, oohh-ing and ahh-ing at the cuteness of this Elephant Cupcake. I call her Ms Ellie. Ms Ellie the Elephant with the longest lashes ever (I'm jealous) 

As you can see, I am making this into a series - The Safari Themed Cupcakes Series and I am going to show you how I'll make them. Pefect to make for kids or with kids, birthday parties, baptism, and  every occasion imaginable. First up, Ms Ellie the Elephant Cupcakes.

What we need - 

Fondant in pink, white and black
Fondant ball tool
Rolling Pin
White small sprinkles

Oval fondant cutter (medium)
Brown gel food coloring
Brush and water

Here's How
(1) Roll pink fondant thinly and cut oval shapes for Ms Ellie's ears

 (2) For Ms Ellie's head and trunk, roll fondant into a ball
(3) Press one side down.
(4) Then roll back and forth.
(5) Using the fondant  ball tool, press the end of Ms Ellie's trunk inward to create a cavity.
(5) Roll small two white fondant pieces into balls and press into Ms Ellie's head
(6) Do the same for the black fondant and add the white sprinkles into Ms Ellie's eyes.
(7) Add the eye details, brows and girly girl lashes and attach the ears.
Hope you liked the tutorial! :)
For more tutorials, see here: http://bakehappy.blogspot.com/p/tutorials.html 
Have a great day everyone! :)