Kamis, 30 Juni 2011

Cupcake Baking 101: Vanilla Cupcakes with a Secret Ingredient!

Hi! Are you ready to bake cupcakes with me?

I am assuming you have stayed with me and learned all about cupcake baking basics.  If not, I do hope you visit Bake Happy’s Tutorials Page so you won’t miss out on all the fun.

We now move on to baking cupcake bases. By bases, I mean we will learn to bake the basic and most well liked of cupcake flavors – chocolate and vanilla. These cupcake flavors are the foundation of most of the cupcake flavors we can possibly make. 

For this post, we zoom in on vanilla. I just recently said I love mint, but I love chocolate as well. And crema de fruta, and tiramisu. And I could not just not include vanilla in the list. That would be an injustice to the silent beauty that is vanilla.

You know what, being a baker, most people would assume that I have that one flavor, that one baked good that tops all the rest. I dread being asked that question. What you’ll get from me is a blank nervous, wide eyed stare. Unfortunately, I don’t have an answer. 

And when I discover a new favorite (like when I discovered baklava), I don’t discard an old favorite to make room for the new one. My heart just expands…erm,  grows (or technically, should it be the stomach?). Is this how moms with two or more kids feel like? 
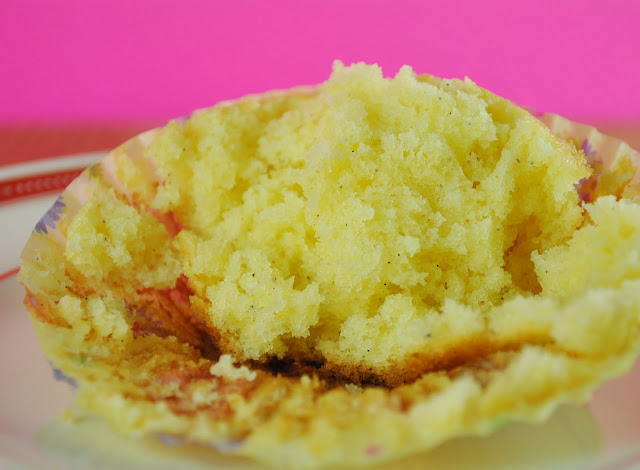
I love the little vanilla beans in this cupcake. Heaven.
So back to the topic. I love vanilla and I have something special to share. A secret that will change your life forever…not. 
Here’s my Vanilla Cupcake recipe. It’s a combination of three recipes really. 

I got the - 
Ingredients from I Like You by Amy Sedaris (Tattletail’s Vanilla Cupcakes)
Secret ingredient from Confections of a Closet Master Baker (Golden Eggs) 
Procedure from Retro Desserts (Diner Style Strawberry Shortcake)

Vanilla Cupcakes
Adapted from I Like You/Retro Desserts/Confections of a Closet Master Baker
375F

Ingredients
1 ½  cups unsalted butter
1 ¼ cup milk
1 ½ cup sugar (if you have vanilla sugar, that would be nice)
2 eggs
2 ½ cake flour
2 ½ tsp baking powder
¼ tsp salt
½ tsp nutmeg (secret ingredient)
2 tsp vanilla extract and / or 1 vanilla pod 


Procedure


Line cupcake pan with paper cups.
Preheat oven.
In a saucepan, bring milk and butter (if using vanilla beans, add them here) to a boil. Remove from heat and cool.


In a large bowl, sift or dry whisk flour, baking powder, salt, nutmeg.
In a mixing bowl, beat the eggs and sugar until pale yellow, fluffy and double in volume.
While still beating, add the butter/milk mixture.


Fold in the flour mixture (if using  vanilla extract mix it into the mixture as well)
Fill the cups two-thirds full with cake batter.

Bake for 15 to 20  minutes.
The result: perfectly domed vanilla cupcakes.
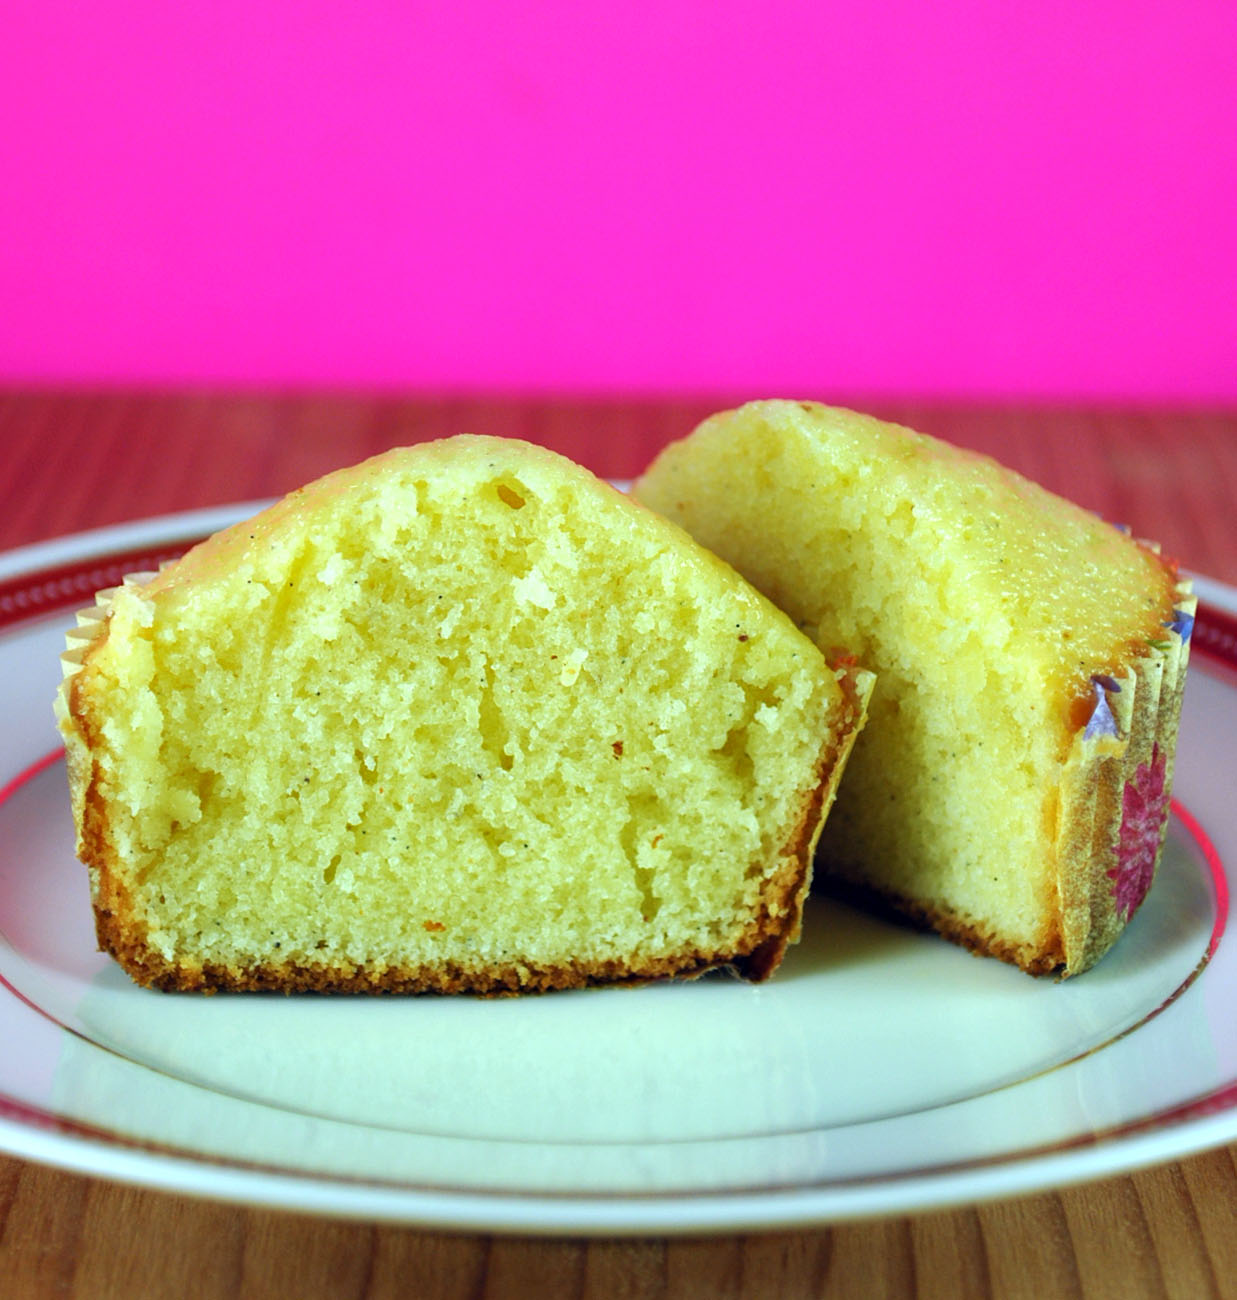
These vanilla cupcakes are perfect. I just don’t know how else to describe them until my friend Kat  said.. her exact words “lumulutang yung vanilla”. Translation: the vanilla flavor just sparkles in these cupcakes. "Sparkles" may not be the right word but something pretty close to that. 

And that my friends, is a wrap.

Happy Cupcaking, 
Aikko


Minggu, 26 Juni 2011

Cupcake Baking 101: 10 Cupcake Baking Essentials

Hi! 

My mind was probably in topsy-turvy when I was planning the Cupcake Baking 101 series. This post should have been the first. 

Anyway, if you have missed the first four posts, here they are:

Okay, let’s pretend this is the first post.

Hi!


Welcome to Bake Happy Blogger’s Cupcake Baking 101. When I started baking cupcakes, I was so excited I went to all the baking stores I could find and bought all the “toys” I can get my hands on. That made a serious dent in my baking funds. Ouch! So I thought I’d spare you all the trouble and list the 10 basic tools you’d need to start baking cupcakes. 
If you decide to take it up as a hobby, you add more “toys” as you seem fit


1. Mixing Bowls
Bowls have several uses in cupcake making. It’s used in mixing the cake butter, the frosting and it can also be used when you choose to dry whisk the dry ingredients (see #4)
2. Whisk
A whisk smoothly blends a cake batter when you do not have a mixer on hand. I must admit, sometimes when whipping up a small batch of cupcakes, I prefer using a whisk than a mixer. It tones my arms. And believe me, I need the exercise.
3. Spatula
This utensil is helpful when folding egg whites to an egg yolk mixture, like when I did this cheesecake or when scraping the sides of a bowl when using a mixer.
 4. Sifter
There are two ways to evenly combine dry ingredients (ex: flour, baking powder, baking soda, salt, cornstarch) together. You can either (a) use a sifter and run through the ingredients three times or (b) dump all ingredients in a bowl and using a whisk, vigorously whisk until evenly combined. If you choose the former, you’d need a sifter. If the latter, an additional bowl is needed and #9 is no longer necessary.
5. Measuring cups for dry and liquid ingredients
There are two types of measuring cups – one used for liquid ingredients (oil, water, milk) and the other one, used for dry ingredients (flour, sugar)
6. Measuring spoons
Baking is an exact science. Recipes should be followed to a “T”.  If a recipe calls for 2 teaspoons of baking powder, you cannot just eyeball the leavener to be placed in your batter and expect a perfectly baked cake. No can do, buddy.
7. Cupcake Pans
All about cupcake  pans here.
8. Cupcake Liners
All about cupcake liners here.
9. Parchment paper
If you choose to mix the dry ingredients using a sifter, two squares of parchment paper will help mix the ingredients evenly.
10. Offset spatula
Once all cupcakes have been baked, the offset spatula will help you frost the cupcake with buttercream. I used an offset spatula to create the sea-like buttercream in this post.

Here are some other “toys” you might like to have - 


Scoops
All about scoops here and here.

Mixer
I would loooove a Kitchen Aid!!! That’s all I’m going to say.


Oven thermometer
Like people, ovens have temperaments too. You’ll get to know your oven as you use it, so use it often and with an oven thermometer so you can control the temperature. Remember, most ovens have hotspots (the part of an oven it is the hottest) so observe where it is as well.


Cooling rack
After taking cupcakes out of the oven you’d need somewhere to place them to cool. And for cupcakes, this is the cool place to be. Yeah!


Cake tester/Toothpicks
I have a cake tester but a toothpick will do as well when testing a cupcake for doneness. Sometimes, a light tap on the dome of the cupcake will also indicate if a cupcake is done. If it springs back, its done. But if you can’t stand the heat, use a cake tester or toothpick.

Have I missed anything? If so, do let me know.


Happy Cupcaking, 
Aikko

Next post: Cupcake Bases: Vanilla

Sabtu, 25 Juni 2011

How to Make Your Own Mint Extract

I have a problem. 

I love mint. But I’m afraid mint does not love me back. No biggie. But it’s time I do something about it. 

You see, I cannot find a decent mint extract here in Manila.


My friend Kitty must have sensed my frustration she even offered so send me a bottle all the way from France. So sweet of her.

Anyway, I decided to make my very own mint extract. I made a big batch. I have a feeling I will be using it often. Here’s how -


Mint Extract:
Adapted from Cooks.com


What we need:


1 canning jar (the one I used can hold 2 cups)
Half a pound of mint leaves
Vodka (any brand will do, it should be at least 80 proof though)


Procedure:
1. Wash mint leaves well and let it dry for a bit.
2. Using a knife, crush/bruise the leaves, stems and all. I was very tempted to julienne the leaves to bring out all the mint-y goodness


3. Place the leaves in the canning jar.

4. Add the vodka.

*** this is as far as I went***


5. Using a piece of well-washed, new cheese cloth, strain (and discard) the leaves from the infusion after three to four weeks.

Tonight, I will dream about all the mint-y goodies I will make three months for now.
York Peppermint Patties, a Chocolate Mint Cake, Mint and White Chocolate Cream Pies, Mint Semifreddo, and oh, maybe I should make Mint Chocolate Chip Cookies and Mint Filled Brownie Cupcakes again. Sigh.  Okay, I’ll stop now.  My waistline is starting to complain.

Happy Cupcaking, 
Aikko


Selasa, 21 Juni 2011

Oreo Kahlua Cookies

I got this recipe from Yummy Magazine’s June 2011 issue. My heart skips a beat whenever I see a new Yummy Mag issue in a 7-11 newsstand. I totally salivate when I see adore the food photographs. You should get one, I read it from cover to cover.

Fact: I read a magazine from back to front. I get disoriented if I do otherwise. Okay, totally irrelevant, I digress.

Anyway, one recipe caught my attention... and it read – 


***Homemade Oreo Cookies***
Dang it got me!

We don’t have kids at home to prepare “baon” or lunch boxes for but my sister and I can take some to nibble on while at work so I decided to give this one a try with a wee bit of a twist. Who can resist an oreo cookie spiked.. erm… I mean flavored with Kahlua? I can’t. 

Oreo Kahlua Cookies
Adapted from Yummy Magazine (June 2011 Issue)

Makes 2 to 3 dozen
Baking time 9 to 12 minutes

For the cookie -
½ cup butter
1 cup all-purpose-floor
1 cup sugar
½ cup cocoa powder
¾ teaspoon baking soda
¼ teaspoon baking powder
¼ teaspoon salt
1 egg
1 teaspoon Kahlua

For the fillng –
½ cup butter
1 ¼ cups confectioner’s sugar
1 teaspoon Kahlua (or more)


1. Preheat oven to 350F
2. In an electric  mixer, combine all the ingredients until they come together to form a dough. Chill for 15 minutes.

3. Shape into balls. [I used my smallest scoop (quarter of an ounce) to form evenly sized cookies]  Place on a cookie sheet leaving a two inch gap in between cookies. 
Flatten a little and bake for 9 to 12 minutes. Let cookies cool. 
Oops, I can't wait, I just have to taste it!
4. Line cookies in columns and flip alternating columns with the bottom facing up.
5. Prepare the filling by mixing all the ingredients in a mixer.
6. For an evenly disdributed filling, place mixture in a piping bag with a round tip attached. 
7. Pipe small dots into the cookies with bottom facing up
8. Sandwich the cookies and enjoy.
And enjoyed it, I did. I washed the cookies down with malt flavored soy milk.
Oreo Kahlua cookies + malt flavored soy milk = a cookie heaven experience.


Happy Cupcaking, 
Aikko


Sabtu, 18 Juni 2011

Volkswagen Beetle Cupcakes: A Father's Day Post

Happy Father’s Day to all Dads, Pops, Granpas and most of all to my Pops, the most wonderful Pops in the whole world. This post is for you.

You see, Pop’s first car is the Volkswagen Beetle and what better way to celebrate Father’s Day than to make him Volkswagen Beetle Cupcakes.

It started with a sketch of mini Beetles. Then I placed tracing paper over it and piped red royal icing over it.


I let the Beetles completely dry first. 

Once the Beetles have dried, I used fondant and the remaining red royal icing to do the details.

These are chocolate mini cupcakes.


Piped with a swirl of delicious yellow buttercream.


To finish it off, I then placed the Volkswagen Beetles on top of the mini cupcakes.


Wondering why I announced the car’s plate number to the whole world? Don’t worry, HFD 619 is actually Happy Father’s Day 6/19. So, I am cool or what? Yeah!


Happy father’s day, Pops! Thank you for everything. I wouldn’t be where I am today if it weren’t for you and Ma. Love yah! Enjoy these cuppies and please save me some okay?

Happy Cupcaking, 
Aikko


Kamis, 16 Juni 2011

Cheese Cupcakes

Hi! 
Yeah. It's me. Again. 
How are you? 

No tutorial for today though. But I am going to share something sweet, nice and totally irresistible. Hey, I am not sharing me, okay? I am sharing these cheese cupcakes. Aren't they rad? I got the recipe from my new friend Barbie of Barbiekins.com Hello Barbie! 

It's actually her mom's recipe. Like Ma, Barbie's mom has kept a treasure chest of recipes that I'm so sure are no-fails, always perfect and sure fire hits. Just like these cupcake bars... erm... cupcakes I mean. Yup, I do not have an 8x8 cake pan as the recipe called for but I do have  some cupcake pans tucked away somewhere [insert *wink* here] so cheese cupcakes it is.

Thanks Barbie and Barbie's mom! I must say I can't wait for the cupcakes to cool down. I grabbed one and ate it right away. Okay, that's not what happened, it was more like... oops, oops ouch (that was me holding the cupcakes in my left then right hand), then bite and chew. Which I repeated until I finished two cupcakes. It was that good! Soft, crumbly, savory and sweet at the same time. The only regret I have is that I didn't put enough cheese topping. I'll definitely smother it with cheese the next time. 
Cheese Cupcakes/Bars

What you need:
2 c all-purpose flour 
1 c sugar 
1/2 c butter, softened 
1/2 can condensed milk 
2 eggs 
1/2 c grated cheese plus more for topping (you can use any kind, but I’d recommend good ol’ Cheddar)

What to do:

Preheat oven to 175C. Grease and flour 8x8in pan or a bigger pan, if you have one. I don’t. Haha.

Cream butter and sugar until light and fluffy. Add eggs one at a time, beating after each addition. Mix in flour, alternating with the milk, starting and ending with the flour. Fold in cheese and mix just until incorporated. 
Pour batter into prepared pan until 2/3 full. Bake for 25 minutes, remove pan from oven and sprinkle top with grated cheese. Return pan to oven and bake for 5 to 10 minutes  or until sides and cheese topping are slightly brown. I baked mine for around 15 minutes, topped with cheese, then baked again for 5 minutes. 

Cool on wire rack for about an hour before cutting.

Happy Cupcaking, 
Aikko