Sabtu, 18 Agustus 2012

How to Make Plants vs Zombies Cupcakes - Pea Shooter (3 of 5)


Related posts:


Wedding cake, wedding cake, wedding cake. This post is not about wedding cake but my week was all about a wedding cake.

You see, if you've been visiting Bake Happy's Facebook page, you know that I have been making a wedding cake for my friends Aileen and Reuel, so things have been pretty much slow on the blogging side.

Although I have been very busy, I have tried to distract you with mouthwatering pictures of Fleur de Sel cupcakes I made on Facebook. Then I enticed you with bunch of images of the best Banana Pudding I ever tasted. To distract you even more, I have even shared a friend's cute garden inspired cupcakes
But today, you and I both know that I can no longer distract you. I know you'll have none of that. So today, I'm sharing part three of the Plants vs Zombies tutorials I made. I already showed you how I made Mr Jalapeno and the Potato Mine. This time we're going back to the basics. Here's how I made the Pea Shooter.
What we need:
Fondant in mint green, electric green and black
Ball tool
Green drinking straw
Small leaf cutter
Knife
Rolling pin
White sprinkles
Brush and water 
Here's How:
(1) Roll out mint green fondant. Cut out three leave. Using the knife, press steam details onto the leaves
 (2) Roll electric green fondant into an oblong shape.
 (3) Further roll one end so it's smaller than the other end.
(4) Using a ball tool, create a cavity on the smaller end. Can you see me on the ball tool? I'm the girl in red holding the camera :) Hi there!
 (5) Add the eye detail.
 (6) Roll three small tear shapes from the mint green fondant.
 (7) Attach to the back of the Pea Shooters Head
 (8) Now we're ready to assemble. The straw will serve as stem, attach the head of the Pea Shooter to the stem then add the leaves and place into the cupcake.
Three down, two more to go! I can't wait to show you more Plants vs Zombies Cupcakes!


Sabtu, 11 Agustus 2012

How to Make Cupcake Faces (Easy Version)


Today, we're taking a break from the Plants vs Zombies cupcake topper tutorials to give way to a very important request. We're making cute cupcake faces today. Though, I would totally understand if you would  just want to revisit the first two Plants vs Zombies tutorials here and here. More on that later, pinky swear. 

And when I say easy version, you probably guessed it right! There will be "average" and "intermediate" cupcake versions later on. I was quite tempted to jump into the intermediate version as I got too excited when I posted this picture on Facebook. But I have to stop myself. We have to do this properly, right guys? So, easy one first. 
To make this tutorial extra special, I based them on three popular child stars we have, Ryzza Mae Dizon, Mutya Orquia, and of course, the most popular when I was still as kid, Aiza Seguerra :)
Ryzza is this year's Little Miss Philippines. Her wit, talent and charm definitely made a fan out of me. I couldn't get enough of her! She's sooo cute and I want to meet her! Mutya, on the other hand, got her break last year when she starred as a mermaid in fantasy series on TV. She's a delight now playing Abby in Be Careful with my Heart. Aiza was Little Miss Philippines in the late 80's and was definitely one of the most successful child stars to date. I loved how she transitioned from being a child star to a musician and a very effective theater actress that she is today.
So we're making Little Miss Aiza first circa 1988 when she first starred in her own movie.
I did say these cupcake versions are easy, right? That's because we'll only need a few things to create these little cuties. Ready?

How to Make Cupcake Faces (Easy Version)

What we need (basics):
Fondant in flesh and black
2 sizes of round cutters
Drinking straw
Buckeye brown food color
Small fine brush for details like eye brows and eye lashes
Small white sprinkles for an extra sparkle for the eyes
Knife
Now, before we really start, I just wanted to show you how real simple this one is. Basic technique is just to -
  • Cut out flesh fondant from the smaller round cutter
  • Create the hair details using the black fondant and the bigger round cutter
  • Add details like the lips and eyes.
From then on, you will be able to create a myriad of possibilities. Here I am showing you three.
Here's how:

Little Miss Aiza

1. Cut out flesh fondant from the smaller round cutter. Cut out black fondant from the bigger round cutter and divide into two. Cut out 2 smaller black circles using the wider end of a small tip. Cut a small portion as shown below.
2. Attach 2 small black round cut outs to the flesh fondant. Still not looking okay, I know, but have faith
3. Using the knife, add some "bangs" details on the black half circle and attach to the little girl's head
4. An option is too add ribbons for a cutie-fied effect. To make things easier, I used a silicone mold for small ribbons
5. Which I attached to Little Miss Aiza's pigtails.
6. Now add some eye details.
7. Using the straw, add a smile to the little lady's face.
Here's Little Miss Aiza!

Very Charming Mutya
1. Cut out a big oval shape from an oval cutter.
2. Cut out flesh fondant from the smaller round cutter. Cut out black fondant from the bigger round cutter and divide into two. Using the knife, add some "bangs" details on the black half circle
3. Place flesh fondant over the oval fondant. Place half circle fondant over the flesh fondant.
4. Using the oval fondant, mark the black fondant on where it should be cut.
5. Cut away excess black fondant.
6. Now add some eye details.
7. Using the straw, add a smile to the little lady's face. And of course, add a new head band as well.
Here she is! Isn't she adorable?


Little Miss Ryzza
1. Cut out flesh fondant from the smaller round cutter. I have a small fish shaped cutter which I used to achieve the pigtails effect.
2. Attach the pigtails onto Little Miss Ryzza's face.
3. Cut out black fondant from the bigger round cutter and divide into two. 
4. Using a knife, cut out baby bangs for the hair and attach to Little Miss Ryzza's face.
5. Add ribbons

6. Now add some eye details.
7. Using the straw, add a smile to the little lady's face. 
Here she is! A very happy, always smiling Little Miss Ryzza!

See, so easy right? From these you can create a thousand possibilities! 
You are only limited by your own imagination. 
So, there you have it folks! Cupcake faces easy version. Please watch out for the "average" and "intermediate" cupcake versions, yeah? :)

Rabu, 08 Agustus 2012

How to Make Plants vs Zombies Cupcakes - Jalapeno (2 of 5)

They say you always have to have a pen and paper on hand in case the inspiration strikes and you just thought of the wittiest blog entry opening ever. This however, doesn't seem to work for me as I often thought of the things I want to say while in the shower. Not the best place to inspire creativity I know, but surprisingly, it works for me. The sad part is, as soon as I step out of the shower, I already forgot what witty thing I had to say.

Bummer.

Instead of pen and paper, I should probably install a whiteboard and a marker in the shower. Well... thinking about it, that would surely up my geekness level and definitely plummet my coolness level down. But then again, I shouldn't have told you that, should I?

Oh well, enough of babbles and on with the tutorials.
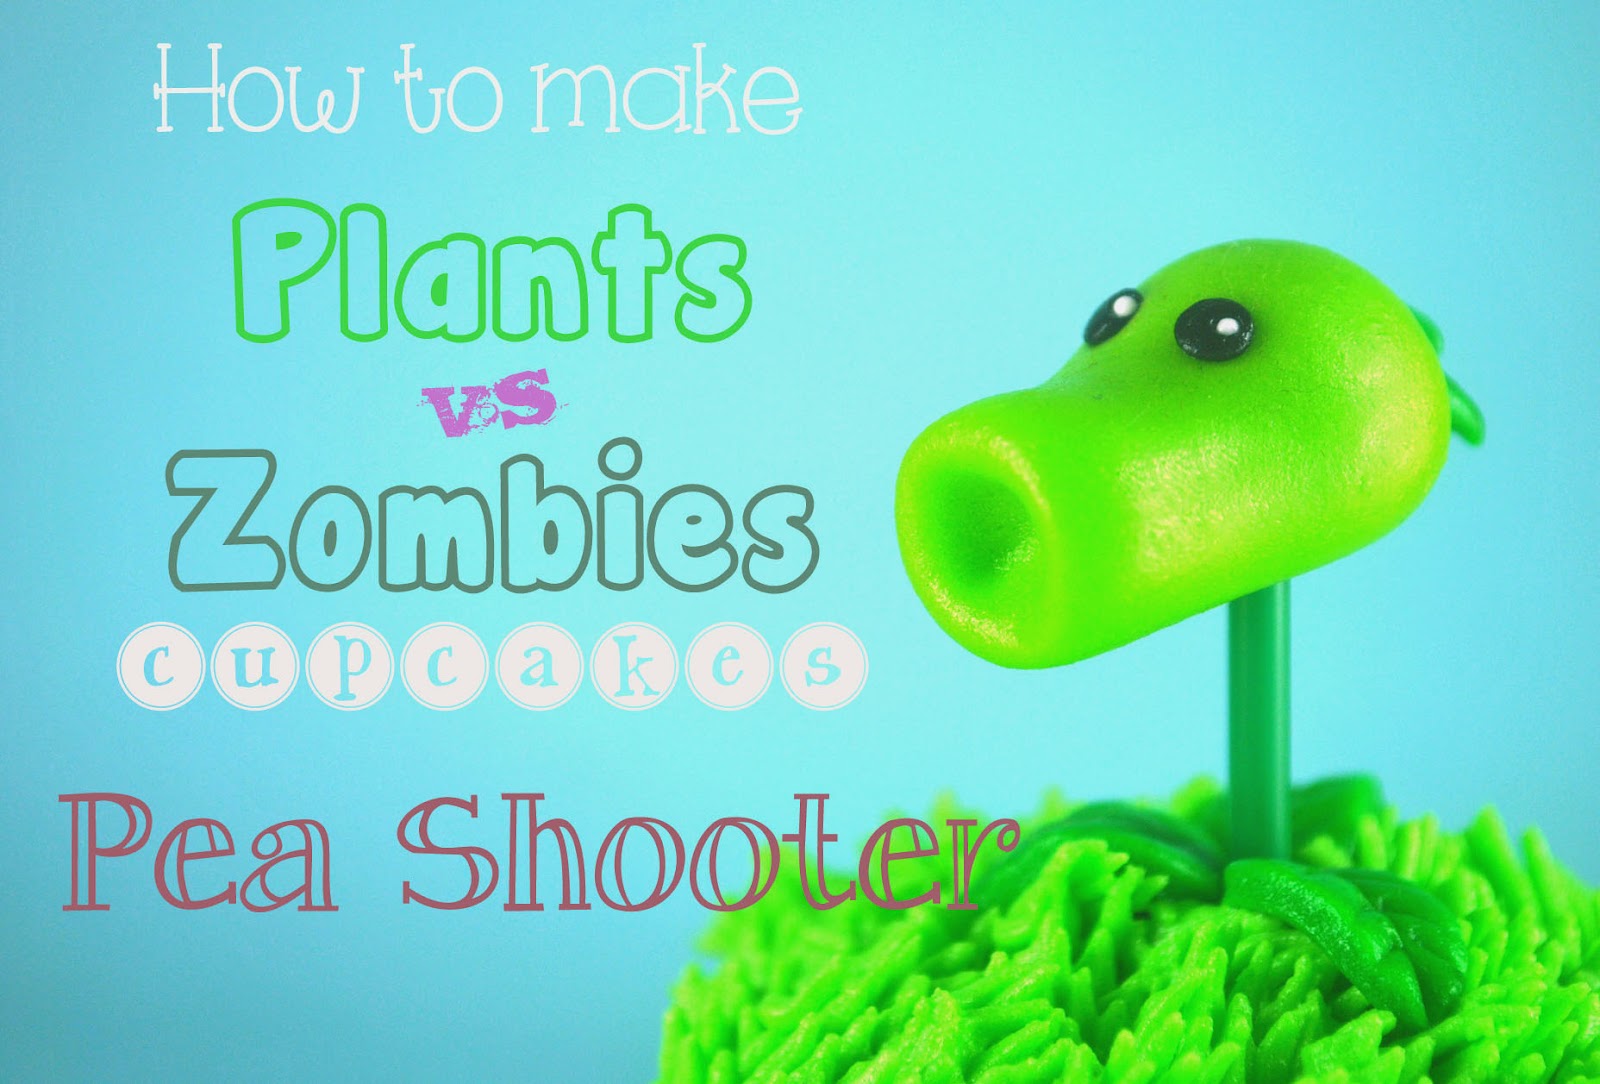
This is part two of the Plants vs Zombies Cupcake Topper series I'm working on. Hope you enjoy it, Bake Happy Friends! :)
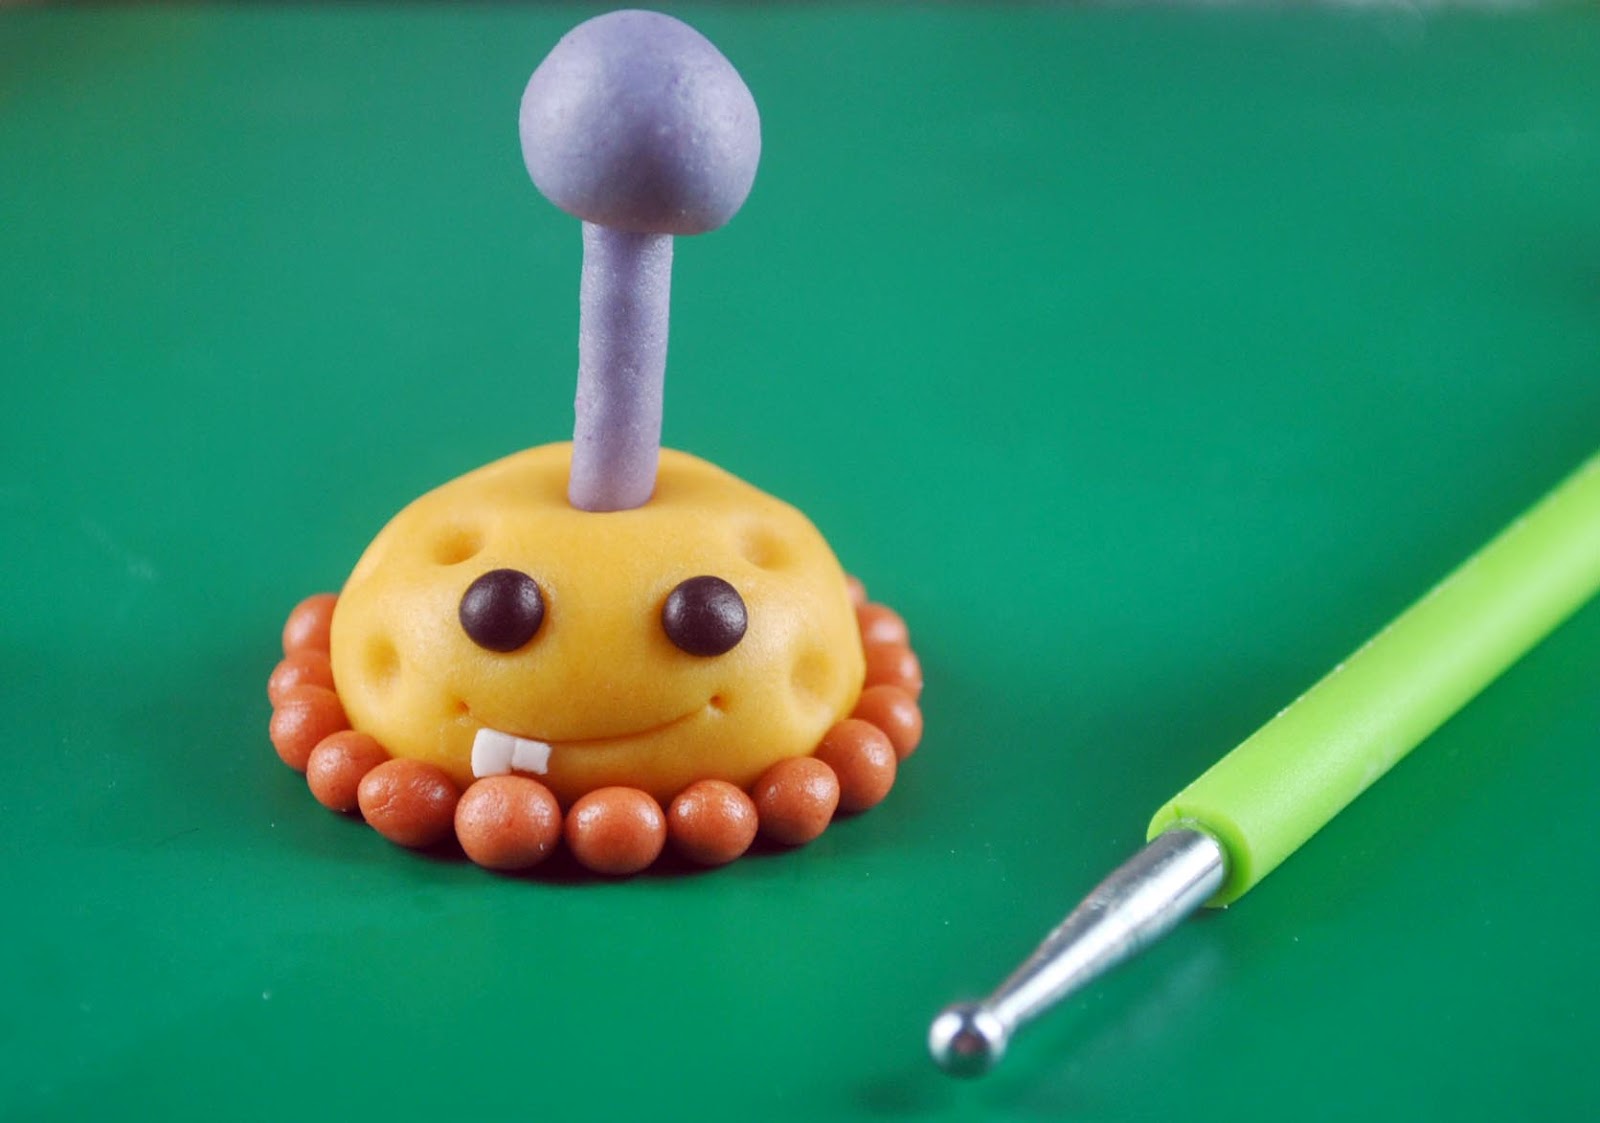
What we need:
Fondant in mint green, red, white and black
Rose petal cutter

Ball tool
Knife
Brush and water
Toothpick
Here's How:
(1) Roll red fondant into a ball
 (2) Then shape it into a teardrop, curl the pointed end to one side
 (3) Roll green fondant into a teardrop shape, flatten the wider end and attach to the red fondant.
(4) Using the ball tool, press sockets into Mr Jalapeno's face. This is for this eyes so they won't bulge too much. He's scary looking enough as it is. 
 (4) Roll two balls of white fondant for the eyes, note that one eye is bigger than the other [Don't ask me why, it is what it is. Maybe we can ask PopCap Games :)]
 (5) Roll out white fondant, cut out a rose petal.
(6) Cut horizontally into half. Add the teeth details using the knife
 (7) With the ball tool, make a dent onto where the teeth is supposed to be
 (8) Attach the teeth
 (9) Roll some small black fondant for the eyes.
(10) Now now now, this is where it gets exciting! Using the ball toll and a knife or a fondant tool, add some character into Mr Jalapeno. Make him look like he's seen better days, make him look angry, make him look ready for a fight! Grrrooowl!!! Though looking at this online images, I can't seem to decide if he's just plain angry with zombies or too frightened of them.  So go ahead shape him up...
Into something like this...
I know what you're thinking. You see, great minds think alike :) I know your wondering where the toothpick will come into play. It'll serve as Mr Jalapeno's lifeline to the cupcake so he can stand...
and fight those zombies away!


on another note...

These past few days have really been challenging. 

I salute the men and women who rescued the flood victims trapped in their homes, the news people who brought us the latest news, to everyone who helped in anyway they can. The rains may be strong but our spirits are stronger.

Clearly, times have changed. What we experienced was not really a storm but "habagat" and it caused so much damage, grief and sadness. My heart goes out to everyone who has been affected by the continuous rains.  

I'm so happy to see sunshine today. We have a lot to be thankful for. Let us help anyway we can. 

Jumat, 03 Agustus 2012

Sprinkle Bakes Book Winners!


Before we announce the winners, I would just like to holler out a BIG thank you to all of you! Love love love the turn out! 
Can't wait for next giveaway! Hope you'll join again, yeah?


Here are the three winners of Bake Happy's first ever giveaway - 

  • Mansi Sharma
  • Mary Grace Columbia G. Tabuzo
  • Nicole Chua
Congratuations!!! Each winner will receive a copy of Heather Baird's Sprinkle Bakes Book
Please expect an email from me on how to claim. Enjoy and happy baking! *hugs*

Kamis, 02 Agustus 2012

How to Make Plants vs Zombies Cupcakes - Potato Mine (1 of 5)


Related posts:


Today [make that yesterday - I got sidetracked watching Ryzza Mae Dizon on Youtube (Oh my that little girl is so witty and cute!)] I asked you, my beloved Bake Happy friends, on Facebook for your requests, comments and suggestions. Basically the kind of stuff you'd like to see here at Bake Happy. 

And wow what a turn out!!! Thank you for all your comments and suggestions. They are pretty awesome! Some requested how I make my people figures, some would love it if I share my recipes for ube, butter and mango cake. Some asked for a tutorial on foxes in fondant and of course there were requests for the all time classics - the sugar flowers. Thank you so much, my dear Bake Happy friends! You guys are the best! I can not wait to get started on your requests :)
But first to start things off, I am doing a series on the Plants vs Zombies cupcakes as requested by .... well.. a lot, so here it is guys! I hope you like it! :) First of is Mr Potato Mine -
How to Make Plants vs Zombies Cupcakes: Potato Mine

What we need:
Fondant in Brown, Ivory, Gray, White and Black
Ball Tool (small)
Lollipop Stick
Water and brush to paste parts together
Here's How:

(1)  Roll ivory fondant into a ball
 (2) Press downward and inward to shape it almost like a French Macaron :)
 (3) Roll small balls from the brown fondant
 (4) Attach the brown balls to the sides of the ivory fondant
 (5) Add details, the eyes, the smile and grin
 (6) Cut lollipop stick to an inch and a half.
 (6) Cover with gray fondant and stick into the center of Mr Potato Mine
 (7) Attach a gray ball of fondant on top.
 (8) Lastly, poke holes onto Mr Potato Mine's head 
 Now isn't that just too easy?

Ahemm... I mentioned 1 of 5 didn't I? That's because there's more so stay tuned! :)